How to Set up Backup and Recovery on Your Own Kubernetes Cluster in 5 Minutes
Regulation is doing more to shape backup strategy right now than almost anything else. NIS2 requires organizations to document their risk management measures, keep an incident response plan on file, and report breaches within 24 hours, with fines that can reach €10 million or 2% of global turnover. DORA goes further for financial entities, requiring documented recovery objectives, regular resilience testing, and an audit trail that holds up to a regulator’s questions. Both apply to Kubernetes environments as much as anything else running in production.
This is why so many platform teams end up choosing self-hosted Kubernetes backup over a pure SaaS product. Keeping backup data inside your own region satisfies data residency rules without a cross-border transfer to explain. Immutable, self-managed storage means a compromised account can’t delete or encrypt your recovery point. And when an auditor asks for proof that a restore works, you can point to logs and test results sitting in your own environment rather than a vendor’s dashboard. Kubernetes disaster recovery, in other words, becomes something you can demonstrate, not just something you claim. That includes recovery time and recovery point objectives: with the data and the logs in your own environment, you can test them on your own schedule instead of taking a vendor’s word for it.
None of that is controversial. The friction shows up at the next step, when it’s time to install the software.
Why self-hosted backup gets a bad reputation
Ask anyone who has stood up backup software on their own infrastructure, and you’ll hear some version of the same story. A storage backend to provision. Certificates to generate and rotate. Network policies to open between components that were never designed with your cluster’s RBAC setup in mind. Multiply that across a handful of clusters and a proof of concept turns into a multi-week project, usually with a support ticket or two along the way.
That reputation is earned. It’s also the reason a lot of organizations default to SaaS backup even when self-hosting is the better fit for their compliance requirements. They assume the tradeoff is unavoidable: control over your data, or a fast setup, pick one.
It isn’t unavoidable
CloudCasa self-hosted was built to remove that tradeoff, and the installation is the clearest proof of it. CloudCasa is built and designed for Kubernetes in Kubernetes. Deploying your own CloudCasa can be done simply by accessing the same image repository from which we use to deploy our own SaaS CloudCasa option.
Below are the actual screenshots from the recording above, in order, the same cluster from start to finish.
Before you start, you need a running Kubernetes cluster with kubectl access, Helm 3 (the recording installs it in one command if you don’t already have it), and the license key and registry credentials from your CloudCasa account.
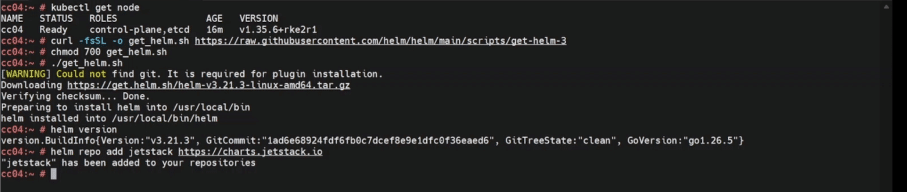
First, confirm the cluster is up:

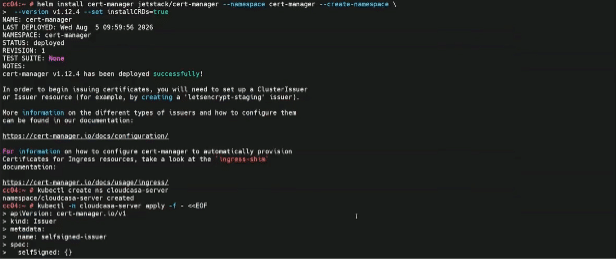
Add the Jetstack Helm repository and deploy cert-manager with its CRDs into its own namespace. This is what lets the cluster issue and manage its own certificates instead of you generating them by hand:
Cert-manager confirms it was deployed successfully. Create a dedicated namespace for the CloudCasa server and apply a ClusterIssuer, self-signed for a test environment like this one, or pointed at a real certificate authority for production:
Add CloudCasa’s Helm repository, authenticated with the username and password from your license:

Install the CloudCasa server itself, pointed at a namespace and a values file:

Helm reports the release as deployed:

A quick kubectl get pods -A confirms every component, cert-manager included, is running rather than just reporting success:
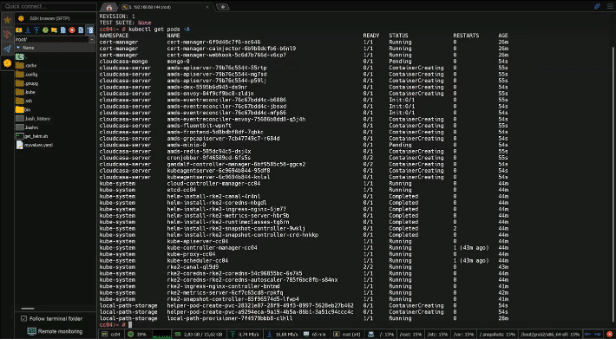
Give it a minute or two, open a browser, and you’re looking at a live CloudCasa dashboard. From there, the next step is adding your first cluster to protect.The installation runs for about 5 minutes from the first command to a working dashboard.
Teams that have put off self-hosted Kubernetes backup because of what they assumed the install would cost them in time are usually the most surprised by this. The compliance case for self-hosting was never really in question. The install just needed to stop getting in the way of it.
Built to Fit Your Environment
Every cluster in the real world looks different from the one in that recording, and that difference is exactly what self-hosted CloudCasa is built for. A self-signed certificate becomes your own certificate authority. A simple local login becomes SSO through Azure, Google, or OIDC. A clean test cluster becomes whatever network policies, air-gapped registry, or internal approval process your organization actually runs. Self-hosted exists so the deployment can be shaped around your infrastructure instead of forcing your infrastructure to match a demo. That shaping works best with us involved: self-hosted comes with dedicated support from our team and the partners we work with, so those environment-specific pieces get worked together with you.
If what you need right now is a fast, zero-setup way to evaluate CloudCasa, the SaaS trial is the better starting point. The two options exist for that reason: SaaS for teams that want to get running immediately, and self-hosted for teams that need the deployment shaped around their own environment, with our team and partners involved throughout. Whichever you choose, you are never limited to a single way of running CloudCasa.
Common questions about self-hosted Kubernetes backup
How long does installing CloudCasa self-hosted actually take?
About 5 minutes on a cluster that’s already up and configured, from confirming it’s ready to a working dashboard. That covers installing cert-manager, creating a certificate issuer, and deploying the CloudCasa server, all with Helm and kubectl.
If you’re just evaluating CloudCasa for the first time, the SaaS version gets you to a working setup faster with nothing to install. Self-hosted makes sense when compliance or data residency requirements call for keeping the control plane inside your own environment.
Why choose self-hosted Kubernetes backup and recovery instead of SaaS?
Mainly data residency and audit requirements. Self-hosting keeps backup data in an environment you control, which matters directly for NIS2 and DORA obligations and for any organization that needs to show a regulator exactly where its recovery data lives.
What do I need before installing CloudCasa self-hosted?
A Kubernetes cluster with kubectl access, Helm 3 (or a minute to install it), and the license key and registry credentials from your CloudCasa account. If cert-manager is already running on the cluster, the installer uses it instead of setting up its own, which matters if your organization restricts self-signed certificates.
Is self-hosted Kubernetes backup only relevant to regulated industries?
Financial services, healthcare, energy, telecom, and public administration feel the most direct pressure from rules like NIS2 and DORA, but any organization that needs to control where its recovery data lives, or prove a restore actually works during an audit, gets the same benefit from self-hosting.
Try it yourself
CloudCasa self-hosted is available with a 60 day free trial, long enough to install it, back up a real workload, and test a restore before you commit to anything.