Kubernetes applications often rely on Persistent Volume Claims (PVCs) to store critical data, from databases to user uploads. Losing this data due to cluster failures or accidents can be catastrophic for DevOps teams. In this post, we’ll walk through how to safeguard your Kubernetes PVCs using CloudCasa, a backup-as-a-service platform. We’ll cover why Kubernetes PVC backup is essential for data protection, how to set up CloudCasa’s Kubernetes backup PVC solution, and a real-world use case of recovering from volume loss. This technical guide provides a detailed, step-by-step walkthrough of CloudCasa’s features and benefits for PVC backups, including screenshots of the process.
Why Kubernetes Persistent Volume Backups Are Essential for Data Protection
In Kubernetes, deployments and configurations (manifests, pods, services, etc.) are usually stateless and can be re-deployed, but PVCs contain stateful data that cannot be simply regenerated. If a node failure, storage corruption, or human error wipes out a Persistent Volume, you risk permanent data loss. Traditional high availability or replication might not cover scenarios like cloud account breaches or complete cluster loss. That’s why regular backups of PVCs are a critical part of Kubernetes data protection.
A robust backup strategy ensures that even if your cluster’s storage is compromised, you can restore persistent data quickly and keep applications running. For example, in one real incident an electrical failure damaged a data center’s storage, but the team restored 24 lost Persistent Volumes in the same day using CloudCasa . This kind of rapid recovery can save hours of downtime and lost revenue. Moreover, backups enable flexibility – you can migrate stateful workloads to new clusters or cloud regions using the saved PVC data, supporting disaster recovery and cluster migrations.
CloudCasa for Kubernetes PVC Backup: Features and Benefits
CloudCasa is a managed Kubernetes backup service (offered both as SaaS and self-hosted) that focuses on protecting entire clusters including PVC data. Unlike DIY tools that you have to install and maintain, CloudCasa provides enterprise-grade backup without the complexity of managing backup infrastructure. This means DevOps teams don’t need to set up or babysit backup servers – CloudCasa’s cloud service handles the heavy lifting, with a lightweight agent in your cluster coordinating the backups.
Key benefits of using CloudCasa for PVC backups include:
- Managed Backup Storage: By default, CloudCasa will copy your PVC data to secure offsite storage (CloudCasa’s cloud or your own S3 bucket) instead of relying solely on local snapshots. Off-cluster backups ensure that even if your entire cluster or region goes down, your data backups remain safe externally.
- Snapshot Integration for Speed: CloudCasa can integrate with CSI volume snapshots for faster, point-in-time captures of PVCs. It can snapshot volumes and then upload the data to cloud storage in the background, minimizing application downtime. Snapshots are orchestrated automatically where supported, and CloudCasa even handles volumes that don’t support snapshots by falling back to direct backups.
- Granular & Application-Aware Backups: You can back up entire clusters or select specific namespaces, labels, or even individual PVCs. CloudCasa’s backup wizard lets you include all resources or filter by app, and it ensures application-consistent backups (including databases) with hooks for quiescing if needed . It also offers file-level restore, so you can recover individual files from a PVC backup without restoring the whole volume .
- Cross-Cluster Recovery and Migration: CloudCasa enables cross-cluster and cross-cloud restores. For instance, you can restore a PVC into a different Kubernetes cluster (e.g., in a new region or for a test environment) as part of a disaster recovery or migration workflow. This flexibility means your backups aren’t tied to the original cluster – you can recover your data wherever you need it.
- User-Friendly SaaS Dashboard: DevOps users get a single pane of glass to manage backups for multiple clusters. CloudCasa’s intuitive GUI guides you through cluster onboarding, backup policy creation, and restore workflows. The dashboard provides a centralized catalog of backups, monitoring, and alerts so you can easily track backup status across all clusters. (Plus, built-in chat support is available right from the interface if you need help.)
CloudCasa’s managed service approach means no maintenance overhead – updates, scaling, and storage management are handled for you. The free trial plan’s 5-node limit and included features lower the barrier to entry, letting teams implement Kubernetes PVC backups quickly. Next, we’ll illustrate a use case highlighting CloudCasa in action and then dive into a step-by-step guide.
Use Case: Recovering from Persistent Volume Loss with CloudCasa
Scenario: Imagine you’re running a stateful application on Kubernetes – for example, a MySQL database with data stored on a Persistent Volume Claim. One day, a mishap occurs: a storage failure or accidental deletion renders the PV (Persistent Volume) unusable. Without a backup, this would mean significant data loss and application downtime. Fortunately, you’ve been backing up the namespace (including its PVC) nightly with CloudCasa.
With CloudCasa, recovery is straightforward. You log into the CloudCasa console, locate last night’s backup of the affected PVC, and launch the restore wizard. CloudCasa allows you to select the specific PVC (or entire namespace) from the backup restore point, choose whether to restore in-place or to a different cluster, and then it handles the rest. In this scenario, you decide to restore to a new PV in the same cluster. CloudCasa pulls the stored volume data from its backup repository and re-creates the PVC and its contents in the cluster. Within minutes, your MySQL pod is re-attached to a recovered volume, and the database is back online with minimal data loss (only data since the last backup).
Now imagine a slight variation: you want to migrate this application to a new Kubernetes cluster (for example, moving from a dev cluster to a production cluster, or from on-prem to cloud). CloudCasa’s restore workflow can also target a different cluster – even in another cloud provider or region – effectively cloning the PVC data into that environment. This use case shows how CloudCasa supports not just recovery, but also migration of persistent data as part of a DevOps workflow.
Through this narrative, it’s clear how CloudCasa’s PVC backup capability can save the day in a crisis. Next, we’ll go through the detailed steps to set up CloudCasa and perform backups and restores of PVCs so you can implement this in your own environment.
Step-by-Step: Backing Up and Restoring PVCs with CloudCasa
In this section, we’ll provide a technical walkthrough of using CloudCasa to back up and restore Kubernetes PVCs. From initial setup to recovery, follow these steps:
- Sign Up for CloudCasa and Connect Your Kubernetes Cluster – Start by creating a free trial CloudCasa account (no credit card required). Once logged in to the CloudCasa dashboard, add your Kubernetes cluster. CloudCasa will prompt you to register the cluster and install a small agent on it. You can either auto-discover clusters if you’ve linked your cloud account, or do a manual install. The simplest method is to choose “Install via kubectl”. CloudCasa provides a one-line kubectl command in a dialog – copy this and run it in your terminal configured to your cluster’s context . This command deploys CloudCasa’s lightweight agent (in the cloudcasa-io namespace). After a minute, the cluster should appear as “Active” in CloudCasa’s cluster list, meaning the agent is connected and ready.

- Configure a Backup Policy for Persistent Volume Claims – With the cluster connected, navigate to the Backups section and click “Create Backup” (or use the Cluster Backup Wizard). You’ll first select which cluster to back up. Next, define what to back up. For a PVC backup, you have options:
- Entire cluster vs. specific resources: You can back up the whole cluster (all namespaces) or specify particular namespaces or labels. If you want to back up a specific application, select the namespace (or label) it runs in.
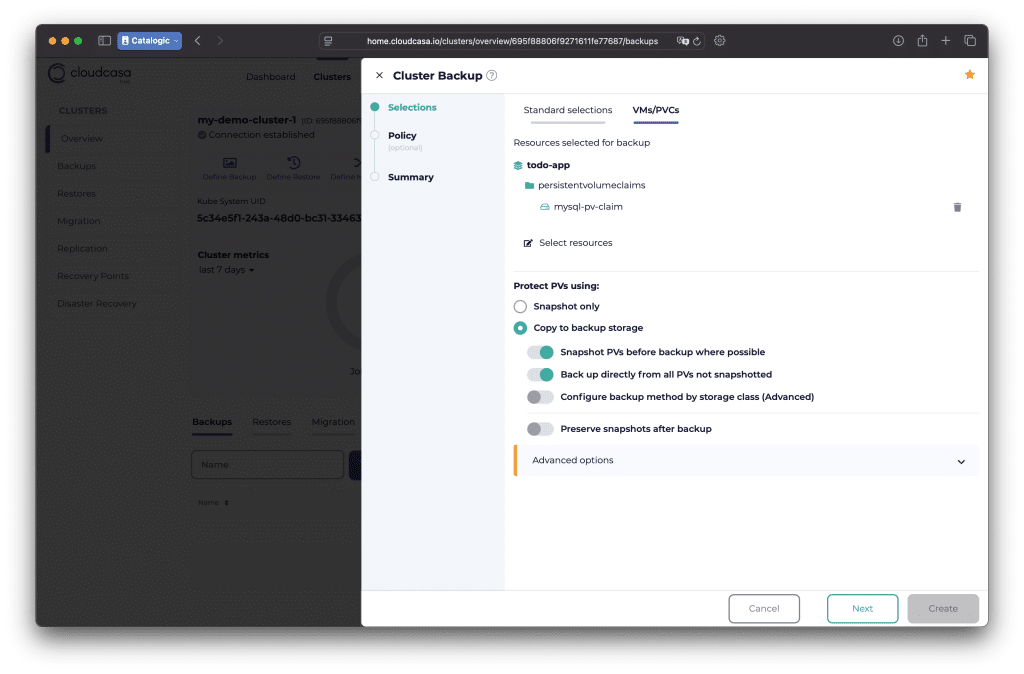
- Include Persistent Volumes: Make sure the option “Include Persistent Volumes” is enabled . This is on by default, which ensures that along with Kubernetes resource manifests, the actual PVC data will be captured.
- Selecting individual PVCs (optional): CloudCasa provides a VMs/PVCs tab in the wizard where you can pick specific PVCs to back up if you don’t want everything . For example, you might exclude a large PVC that’s less important, or target only a critical database PVC.
- Snapshot vs. Data Copy: Choose the method for PV protection. The default and recommended choice is “Copy to backup storage”, which will copy the PVC data to CloudCasa’s storage (or your configured backup repository). This ensures an off-site backup. Alternatively, “Snapshot only” can be selected if you just want local snapshots on the cluster (faster, but less safe on its own) . We’ll stick with the default, which actually uses snapshots plus off-cluster copy for the best of both worlds.
- Scheduling and retention: Set a schedule (e.g. nightly at 2 AM) or choose on-demand backup. For this walkthrough, you might run it once manually. Also choose a retention period; for the free trial plan, backups are retained up to 30 days by default. After configuring these options, save the backup job. CloudCasa will either run it immediately (if on-demand) or at the scheduled time.
- Run and Monitor the Backup – If you created a manual backup job, kick it off by clicking “Run Now” (or simply wait for the schedule). CloudCasa will begin backing up the selected resources. Under the hood, if “Copy to backup storage” was chosen, CloudCasa will first attempt to create CSI snapshots of the PVCs for consistency, then spawn data mover pods to stream the snapshot data to cloud storage. You can monitor progress in the Activity or Backups dashboard in CloudCasa’s UI. There you’ll see the backup job running, and it will list how many resources and PVCs are being backed up. Once complete, it should show a “Completed” or “Success” status. You can click on the backup to see details, like which PVCs were included and the size of the backup. Tip: CloudCasa’s centralized catalog keeps all your backup recovery points organized, so you can confirm that the PVC backup is indeed listed and retained for restore.
- Restore the PVC Data from Backup – Now, simulate the scenario of needing to recover data. In CloudCasa, go to the Recovery Points or Restores section. Find the backup you created (by date/label/cluster name) and start the Restore Wizard. The wizard will guide you to select:
- Source Recovery Point: Choose the specific backup snapshot that contains the PVC you want (e.g., the backup from last night).
- Resources to Restore: You can restore everything from that backup or drill down to a particular PVC (or the entire namespace that contained the PVC). For our use case, select the PVC (or the app’s namespace) to restore.
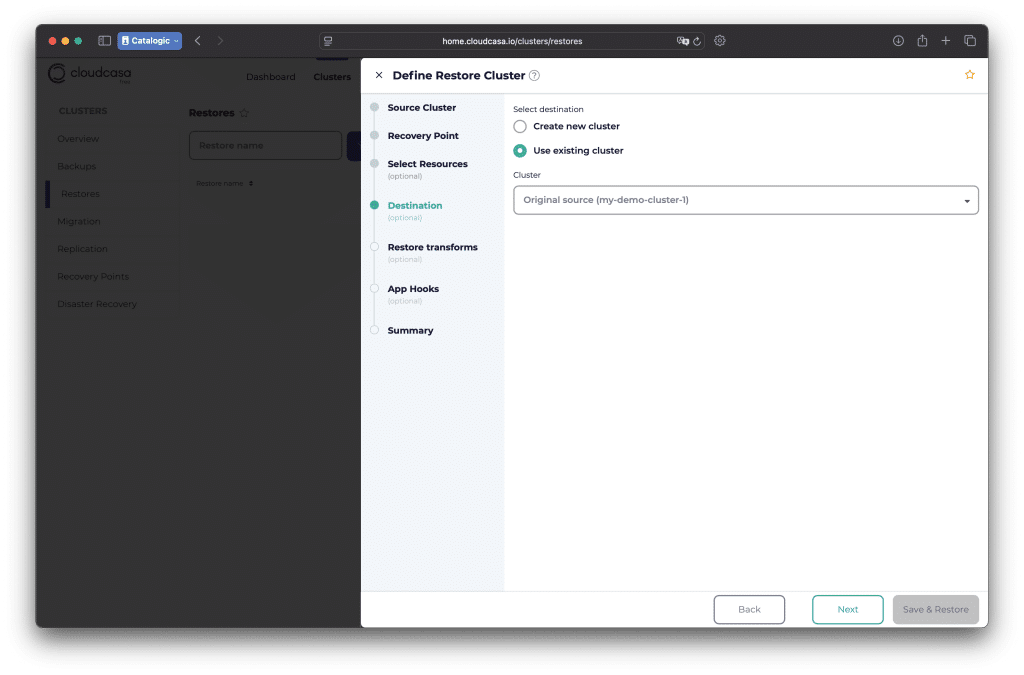
- Target Cluster and Namespace: Decide where to restore the data. You can restore back to the original cluster (either overwriting the original PVC or under a new name) or to a different cluster (for migration or testing). If restoring to a different cluster, make sure that cluster is also registered in CloudCasa. You can also specify a new namespace or use the original one.
- Restore actions: CloudCasa will then create the PVC and restore the data into it. If the original PersistentVolume or StorageClass doesn’t exist on the target, CloudCasa can map to a new storage class (you may need to confirm the mapping if different storage backends are used).


Start the restore job and let CloudCasa do the work. In the activity monitor, you’ll see it retrieving the backup from storage and rehydrating the PVC. Once finished, you should have the PVC data restored in the cluster. For example, if you had deleted a MySQL PVC, CloudCasa would recreate that PVC and you could reattach your MySQL pod to it. If you chose to restore to a new cluster, you’ll see the namespace and PVC appear there. CloudCasa’s UI makes this process straightforward – simply point and click to select the backup, files or volumes you need, and where to put them, without complex CLI commands.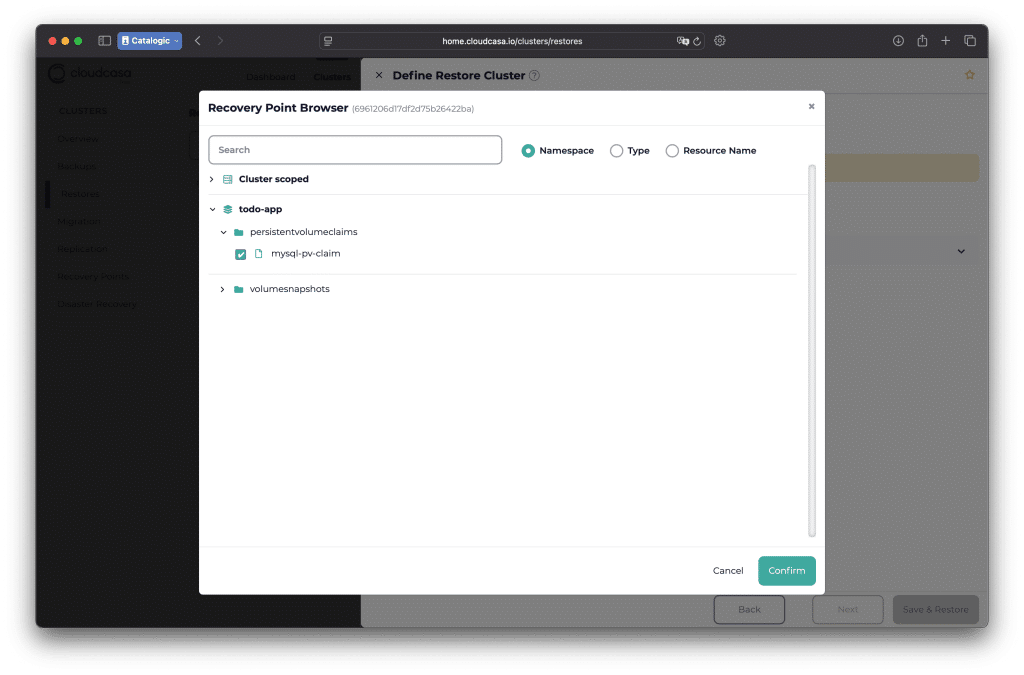
After the restore, verify that your application is using the recovered PVC data (e.g., the database is running with all its tables). You have successfully demonstrated a full backup and restore cycle for a Kubernetes PVC using CloudCasa!
Conclusion: Simplify Kubernetes PVC Backups with CloudCasa
Backing up Kubernetes PVCs is no longer a daunting task reserved for storage experts. Tools like CloudCasa make Kubernetes data protection an accessible, automated part of your DevOps workflow. In this guide, we showed how CloudCasa’s PVC backup solution provides a safety net for stateful workloads: from easy setup and scheduling to fast recovery when it counts. CloudCasa’s free trial plan (protecting up to 5 nodes at no cost) and its managed service approach eliminate excuses – you can start securing your cluster’s persistent data within minutes .
For DevOps teams, the value is clear: prevent data loss, enable cross-cloud migration, and ensure business continuity for your Kubernetes applications with minimal effort. CloudCasa’s rich feature set (like file-level restore and multi-cluster support) further enhances your backup strategy without adding complexity. If you’re responsible for Kubernetes operations, don’t wait for a disaster to strike. Take advantage of CloudCasa’s SaaS solution and try CloudCasa today to safeguard your PVCs and keep your Kubernetes workloads resilient. Your future self (and your organization’s uptime) will thank you.