What is AWS Elastic Load Balancer?
Load balancers are an integral component of any production environment. They allow the distribution of traffic across multiple available backend servers so that no single server becomes overwhelmed due to traffic. A load balancer can be configured for workloads running on AWS through the Elastic Load Balancer (ELB) service. At a high level, an ELB consists of 3 main components:
- Listeners: A process that checks for incoming traffic based on predefined rules. For example, we can create a listener that looks for HTTPS requests for the hostname “*.cloudcasa.io”, with header “X-header-string: abcdefg123” and URL query parameter “tag=free” and then route the request to a specific target group or groups.
- Target Groups: Route the traffic to one or more targets based on the specified protocol and port. For example, we can add a target group to the listener created previously so that it can direct the traffic to a group of EC2 instances on port 30450.
- Load Balancers: The main component of an Elastic Load Balancer. This is a server that distributes and routes traffic depending on the rules specified for the listeners and target groups.
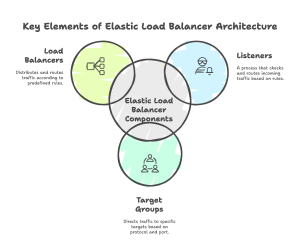
AWS offers 3 different types of Elastic Load Balancers:
- Classic: The original load balancer offered by AWS. It is a traditional load balancer that evenly distributes traffic across different targets. However, it is limited to just basic rules for routing for its listeners.
- Application: More advanced and operate at the application layer (layer 7). This allows routing of traffic based on the type and content of the request.
- Network: Operates at the transport layer (layer 4). This allows the routing of high volume of low-latency traffic, like for TCP and UDP-based applications for example.
How do you Configure AWS ELB With an EKS Cluster?
If you have a web application running on your EKS cluster, how do you expose this application so that your users can access it? The Kubernetes resources for “Service” and “Ingress” allow you to expose specific applications, but this will not work out of the box. A Service of type “LoadBalancer” or an Ingress resource must be handled by a controller. For EKS, the AWS Load Balancer Controller can be used to automatically create ELBs based on routing information defined in the Kubernetes resource.
There are a few prerequisites when setting up the AWS Load Balancer Controller. The VPC subnets must be tagged for them to be automatically discovered. An IAM policy and role must be created to allow the controller to create the ELB. IRSA can be set up to authenticate with AWS. The security groups must be configured to allow traffic from the Kubernetes control plane. Once the prerequisite steps have been completed, you can install the AWS Load Balancer controller using YAML manifests or through a Helm chart. This will create the Kubernetes Deployment, Service Account, and all the CRDs required for Ingress and the ELB. See installation instructions for the Elastic Load Balancer controller.
After the controller is installed, a new Elastic Load Balancer can be created by simply creating a Kubernetes Service resource of type LoadBalancer or an Ingress resource with the “ingressClassName” field set to “alb”.
service.yaml
apiVersion: v1
    kind: Service
    metadata:
        annotations:
            service.beta.kubernetes.io/aws-load-balancer-nlb-target-type: ip
            service.beta.kubernetes.io/aws-load-balancer-scheme: internet-facing
            service.beta.kubernetes.io/aws-load-balancer-type: external
    labels:
        app: wordpress
    name: wordpress
    namespace: web-1
    spec:
        allocateLoadBalancerNodePorts: true
        externalTrafficPolicy: Cluster
        internalTrafficPolicy: Cluster
        ports:
        - nodePort: 31307
            port: 80
            protocol: TCP
            targetPort: 80
        selector:
            app: wordpress
            tier: frontend
        sessionAffinity: None
        type: LoadBalancer
ingress.yaml
apiVersion: networking.k8s.io/v1
    kind: Ingress
    metadata:
        annotations:
            alb.ingress.kubernetes.io/scheme: internet-facing
            alb.ingress.kubernetes.io/tags: Environment=dev
            alb.ingress.kubernetes.io/target-type: instance
        name: wordpress
        namespace: web-2
    spec:
        ingressClassName: alb
        rules:
        - host: dev-test-1.cloudcasa-io
        http:
            paths:
            - backend:
                service:
                name: wordpress
                port:
                    number: 80
            path: /
            pathType: Prefix
It is also possible to create the Elastic Load Balancer manually or using an IaaC tool such as Terraform. Afterwards, a TargetGroupBinding resource must be created to map a Service resource to the target group of the ELB.
targetgroupbinding.yaml
apiVersion: elbv2.k8s.aws/v1beta1
    kind: TargetGroupBinding
    metadata:
        name: manually-created-tgb
        namespace: web-3
    spec:
        ipAddressType: ipv4
        serviceRef:
            name: wordpress
            port: 80
        targetGroupARN: arn:aws:elasticloadbalancing:us-east-1:119168589270:targetgroup/md-manually-created-tg/ea5cdb8c511e6231
        targetType: ip
How Can CloudCasa Back up and Restore Elastic Load Balancers for your EKS Cluster?
As we have seen previously, an ELB has multiple components, each with its own set of configurations. It is not sufficient to only back up the configurations for the Listener, Target Groups, and Load Balancers. Kubernetes resources like Service, Ingress, and TargetGroupBinding can all have configurations that can affect the operation of the ELB as well. In addition, there are also the VPC, subnet, and security group configurations that must be backed up along with the ELB in order to be able to do a proper restore later.
CloudCasa can protect your EKS cluster along with all the Kubernetes resources including Service, Ingress, and TargetGroupBinding. The first step is to register your AWS account using our CloudFormation stack template. After connecting your AWS account, CloudCasa will automatically discover all of your EKS clusters. You can then register an EKS cluster by installing the CloudCasa agent. Once the agent is installed, you can define and run a backup.
You can see all the details of what was backed up in the job activity:
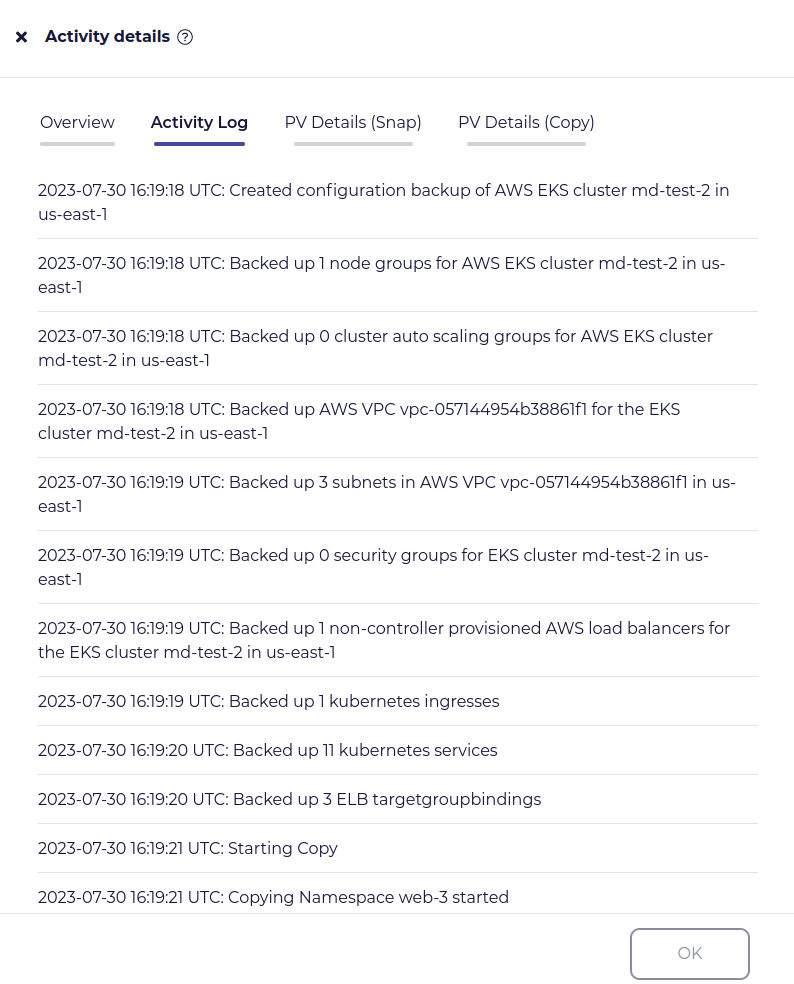
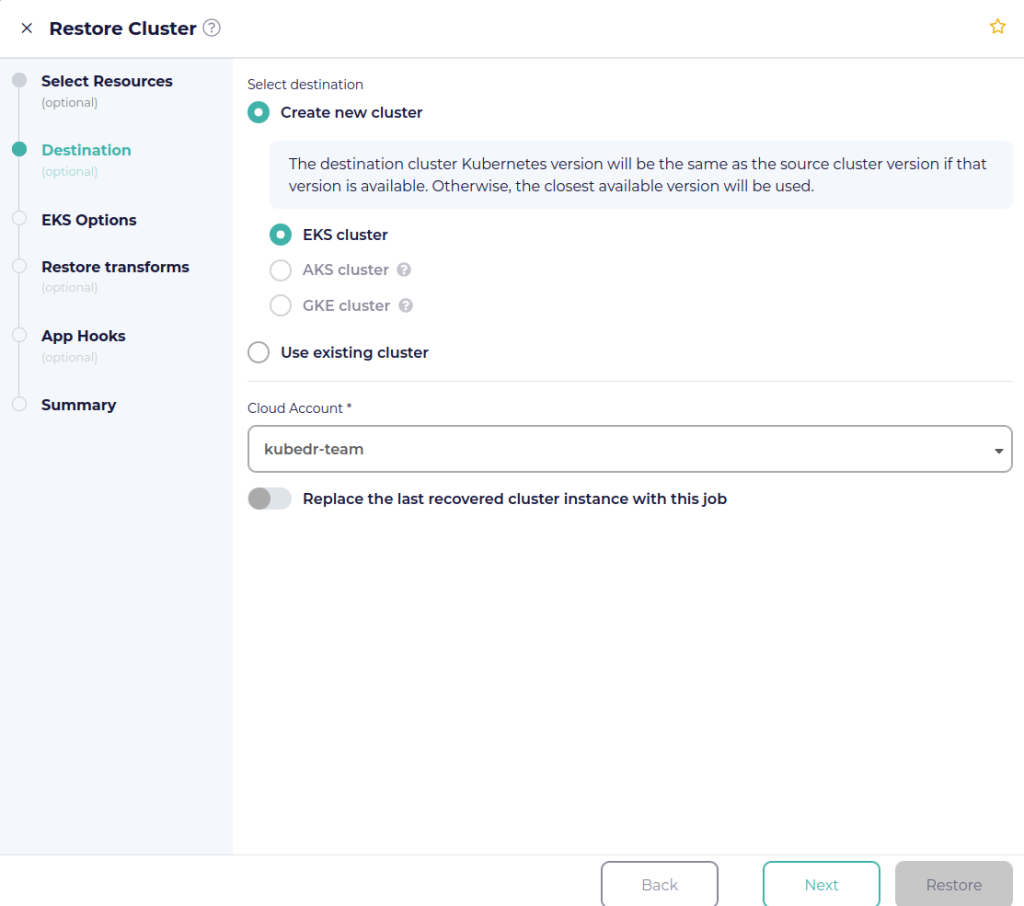
To restore from this backup, navigate to Protection > Recovery Points. For the latest recovery point, click Actions > Restore. In the Destination section, select “Create new cluster” and select “EKS cluster”. Then select the AWS account where the new EKS cluster and load balancers will be created.
Navigate through the EKS options to update configurations for the new EKS cluster. The “Load Balancers” section consists of parameters that can be updated for any ELBs that are associated with the EKS cluster. First select the IAM role for the AWS Load Balancer Controller. CloudCasa will configure the controller for you. This includes creating the OIDC provider and updating the IAM role to add to the trust relationship policy. The Kubernetes Service Account for the controller is also annotated to setup authentication using IRSA.
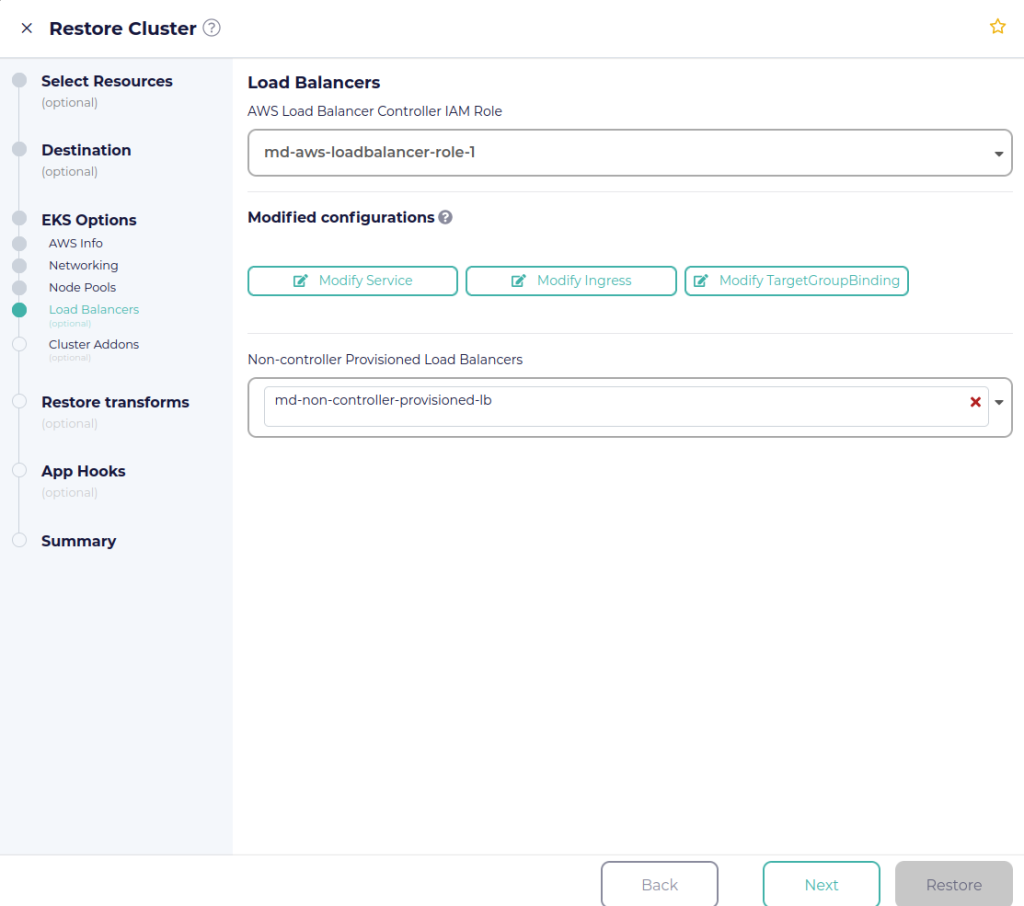
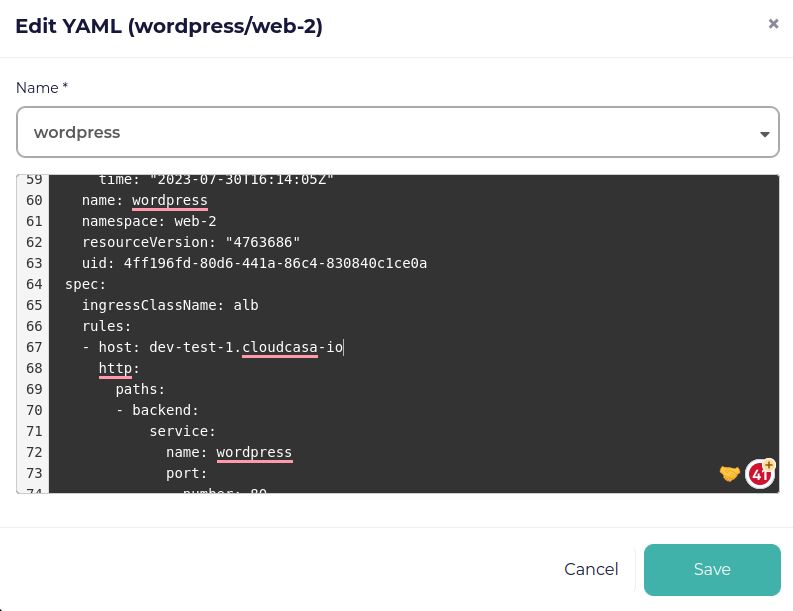
Under “Modified configurations”, you have the option to update specific Kubernetes resources such as Service, Ingress, or TargetGroupBinding. For example, you can modify an Ingress resource to update the annotations and even the rules including the hostname. CloudCasa will then restore this resource using the YAML provided.
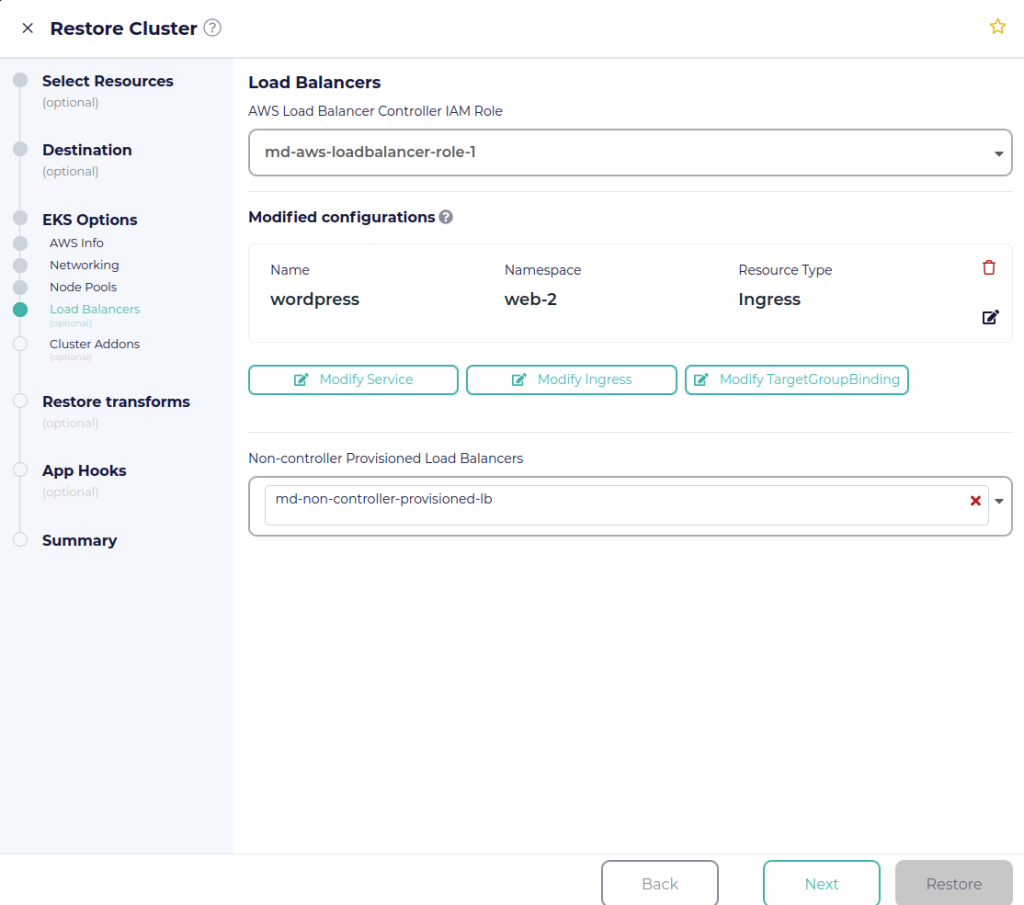
The “Non-controller Provisioned Load Balancers” field allows you to select load balancers that were created manually or through a tool like Terraform. CloudCasa has backed up these resources, and by default will restore them with the same configurations. However, some configurations like VPCs, subnets, and security groups may change depending on what was specified in the previous steps. Once you are satisfied with the load balancer configurations, you can proceed to the next steps and create the restore.
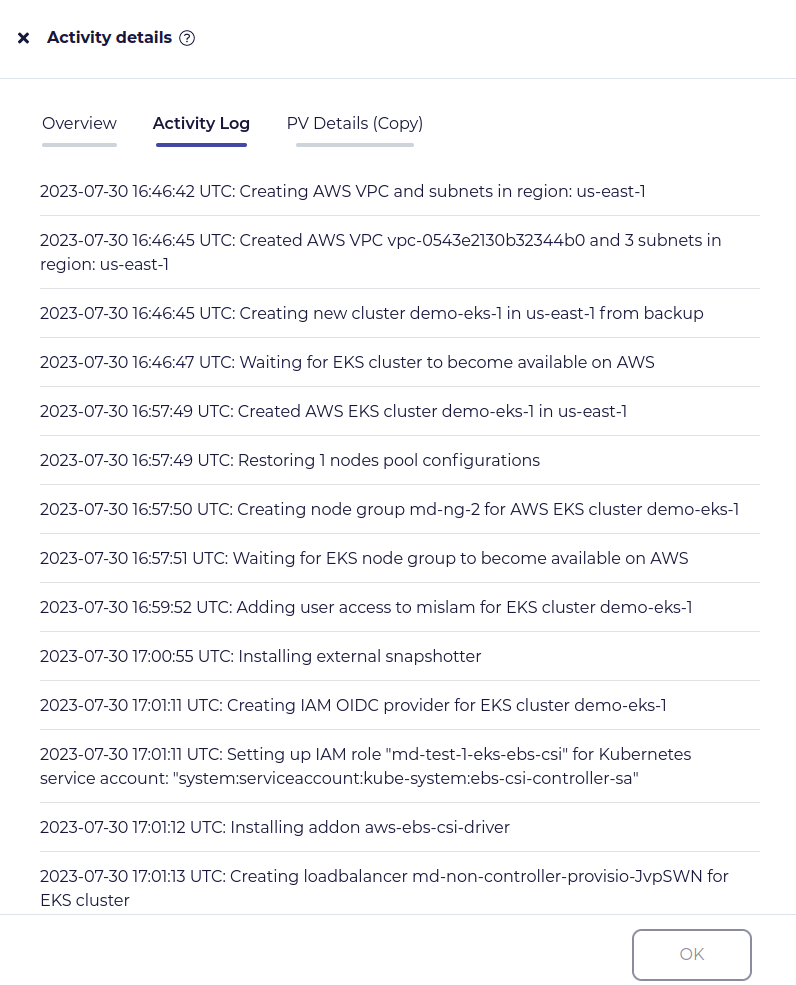
In the restore job activity, you will be able to see the entire process of how CloudCasa restores the EKS cluster along with all the ELBs.
Easily Restore Your Elastic Load Balancers with CloudCasa
In summary, the procedure to back up and restore an EKS cluster with its associated Elastic Load Balancers can be daunting. There are many resources that need to be accounted for, including the Listeners, Target Groups, Load Balancers, VPC, Subnets, Security Groups, the load balancer controller, Services, Ingresses, and TargetGroupBindings, not to mention the EKS cluster itself and all the resources associated with it. CloudCasa makes this process a whole lot easier by automatically backing up all of these resources and allowing you to easily restore them with modifications.
You can try the free service plan for CloudCasa, no strings attached. We’d be happy to connect with you over a call and talk through your Kubernetes data protection challenges. If you want a custom demonstration or just have a chat with us, get in contact via casa@cloudcasa.io.